Getting Started
To get started, visit our consignment software, MYCM, at https://www.myconsignmentmanager.com/hfumc/
New Users
- Click Create User Account
- Complete information
- Click Create Account button
- Please check your email account for a confirmation email that will let you know you have successfully registered for the sale.
Returning Users
- Enter your user id and password. If you have forgotten either one, please use the links provided to have them emailed to you.
- On the “Sale’s Registration Options” page, your previous consignor # will appear in the Seller # box. Do not change this number.
- Complete the “how did you hear about us” section and then click “Register Me.”
- Please check your email account for a confirmation email that will let you know you have successfully registered for the sale.
Select “Check-In Schedule.” This is the appointment for dropping off your inventory; you must have an appointment to participate in our sale. Popular appointment times fill up fast. Consignors who volunteer for Receiving Shifts should choose an appointment before or after their volunteer shift.
**Note: Do not click “Register Me as a Volunteer Only” if you are going to be a seller. You will be given the option to volunteer on the next page.
Volunteer to Get More Money
Volunteering helps us run the sale efficiently and effectively, and you will have the opportunity to shop first and can make more money!
To volunteer, select “Volunteer.” Pick the time slots that work best for you. The more you volunteer, the better your benefits.
Preparing your Items
Items Needed for Tagging
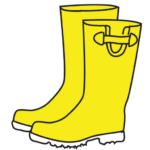
- Iron
- Zip-loc bags
- Clear packaging tape
- White card stock
- Silver safety pins
- Zip ties
- Wire hangers
Hanging Clothes
- Clothing size 2T and up must be on wire hangers. This is for protection of the items and space on the racks. If your clothing is on plastic hangers when you check-in, you will be asked to rehang it all on wire hangers.
- Clothing sizes 0 to 24 month items can use plastic or wire hangers.
- Clothing should be attached to the hanger in a secure fashion.
Pinning & Tagging
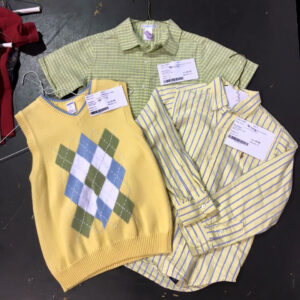
- The hook of the hanger should face toward the right shoulder of the item. (The hook will appear left when you look at it laying flat and face up. Please see photo above.)
- All tags must be printed on white cardstock. No plain paper tags will be accepted.
- The tag should be pinned with a silvertone safety pin on the left shoulder of the item. (The tag will appear right when you look at it laying flat and face up.) Do not use small gold safety pins or straight pins.
- If your tags are pinned incorrectly, we will ask you to re-pin them, so that they will show properly when hanging on the racks.
- Pins should be placed above the dotted line on the printed tag.
- If the item has multiple pieces, pin them all together so they do not become separated.
- Pants on a paper-covered hanger will slide less and look neater, helping them to be seen better.
- Many dry cleaners will give you hangers, or you can purchase light-weight wire hangers from Wal-Mart, Dollar General, etc.
- Clothing seems to sell best when paired with coordinating items and hung as an outfit.
Toys
- Toys with small parts should be placed in a ziploc bag, with the bag securely taped with clear packing tape. Please do not put tape over the bar code.
- If small parts go with a larger item, please secure the bag to the larger item with packing tape.
Shoes
- Shoes should be properly secured together, whether with a zip tie, in a zip-lock bag, etc. It is common for customers to want to try shoes on their children, so please keep this in mind. We find a lot of lost tags from shoes, so please attach as securely as possible.
Entering Items to Sell
Please see our list of approved items.
Entering Items
Choose “Enter Items” AND enter all requested information, including:
- discount -check this box only if you would like your item to be sold for 50% off on discount days.
- donate – check this box if you plan to immediately donate this item if it has not sold by the end of the sale
- size – please use numbers, i.e.: 4T, 5, 6, and not letters, i.e.: S, M, L, etc. (unlessthe item is a maternity or junior item)
- description/brand name – 2 lines are provided, so be as detailed as you want
- price – select price from drop-down menu; prices are in $.50 increments
- category – select a category from the drop-down menu
NOTE: Your seller number is pre-filled so the correct number will always be on your tags. After entering your item, click “Add item”. Your item is now saved in your inventory and you can enter your next item. HINT: The process goes faster if your clothing is sorted by gender, size and brand. This is because certain fields retain their previous information after an item has been entered, thus allowing you to tab through those fields making the entry process even faster! TIP: You can put the brand on line 1 of the description and more detail on line 2. Example: Description Line 1: Gap, Description Line 2: denim dress.
Transfering Items from Prior Sale
- Go to “Manage Inventory”
- Select “Items NOT sold only”; select previous sales from which you wish to transfer items; then click on “Generate Items List”
- Check all items you want to transfer
- Select the sale you want the items moved to from the drop-down box
- Click on “Transfer Item(s) to Consignment”
- Your items have now been moved to the current sale and you have not had to retype anything!
- Please do not directly transfer all items that didn’t sell in another sale directly into our sale. If they didn’t sell last time, then the price and item need to be reevaluated, plus tags get old and don’t scan well when transferred from sale to sale.
NOTE: If you wish to transfer items from other sales which are not Floods of Duds, you will need to log in to your mycm account from www.myconsignmentmanager.com. This is because when you log in through www.floodsofduds.com, you will only see Floods of Duds sales.
Accepted and Unaccepted Items
Please see our list of approved items.
Pricing
Here are some tips:
- Ask yourself: would I buy these items at the price I am asking?
- Usually consignors use the rule of thumb “do not price more than 50% of what it was purchased for.”
- Keep in mind the age and condition of the item.
Printing Tags
You can either print tags as you go or after you have entered all your items. You will print 8 tags to one sheet of cardstock.
Paper requirements:
Your tags should be printed on white cardstock any weight between 65lbs and 110lbs should be fine. Do not use textured paper as barcodes might bleed.
To print tags:
- Select the group of tags you want to print from the options available. Select the sale from the drop-down menu.
- Click on “Generate Items List.” (Read instructions to generate tags at top right ofscreen.)
- Check tags to print. If you are choosing to print all your tags, you can select the box at the top of the items list and it will automatically select all of your items. Click on “Generate tags”.
- You do not need a print code if you registered through the www.floodsofduds.com website!
- In order for your tags to generate properly, you must have your web browser set to allow pop-ups for this website.
- Click on the link provided to download your tag file.
- Print the file.
Check-in
You must schedule an appointment to bring your items to our sale. Please select your appointment time as early as possible; popular appointment times fill up fast. Consignors who volunteer for Receiving Shifts can choose an appointment before or after their volunteer shift.
Changes to your appointment time can be made using MYCM before Saturday receiving begins. Please delete your prior appointment time and schedule another one in any of the remaining time slots. If you must change or cancel a check-in appointment after receiving begins, please email us at floodsofduds@gmail.com.
Before you come to Check-In
Sort your clothing by size and gender to speed up the process for our volunteers.
Make arrangements for childcare. Your children are welcome to come with you if necessary, but your appointment might go more smoothly if you come alone. Unfortunately, we can only provide childcare for volunteers during their volunteer shift.
Label your bins with your name; they often get left behind by mistake.
Plan to come as close to your appointment time as possible, but be prepared to wait if we are running behind.
Please bring all items to your appointment.
What to Expect at Check-In
Please park in the parking lot on the Indian Lake Road side of the church. You should see a sign on the middle double doors under the white columns for the Consignor Entrance. Please use this door and come down the ramp and hallway to our gym.
Inside the gym doors, stop at Check-in Central. We will start the process for you and put your name in line to have your items inspected.
While you wait for your turn at a Check-in table, please bring all of your items to the designated waiting area.
After your items have all been unloaded please have five items test scanned near Check-in Central. Items with tags that do not scan cannot be sold at our sale. If your tags do not properly scan, you might need to reprint your tags. We will have computers, printers, and cardstock available for this situation.
When your name is called to go to a check-in table, please carry your your items to your assigned table and the Receiving Volunteers. Please return the the Consignor Waiting Area.
After your items have been checked, you will be called back to the check-in table to collect your unaccepted items.
Please return the Receiving Checklist to Check-in Central. You will sign your Consignor Agreement, receive the appropriate Presale Pass and be free to go. Please checkout with us before you leave.
Viewing Projected Earnings
Viewing Your Projected Earnings
Once the sale is underway, we will update the system nightly with items that have sold during the day. To view your projected settlement, follow these steps:
- Click on the option “View Settlement Report”.
- Your sold items will not appear as sold in your inventory until the sale is closed and the consignor checks have been generated. We will notify you when this step is complete.
Pick-Up
- On pick-up day, bring a box or laundry basket to collect your smaller items and make it easier to carry to your vehicle.
- Please arrive after 1pm and before 3pm, and check in with our committee members at the front of the gym to receive instructions regarding pick-up.
- Make sure to bring your the claim ticket with your consignor # on it to ensure an efficient pick up process.
- Look through the items to make sure everything in your stack belongs to you. We do our best to sort everything correctly, but it is a huge task and mistakes could be made.
- Take a moment to look through the “lost my tag” section. Sometimes we find items that have lost their tags and we want to return them to their rightful owner.
- Consider donating unsold items. Nonprofits such as Samaritan Center, Cumberland Pregnancy Center, Nurses for Newborns and local schools thankfully pick up unsold items.
- Checks will be mailed the week after the close of the sale.